Tuesday 31 December 2013

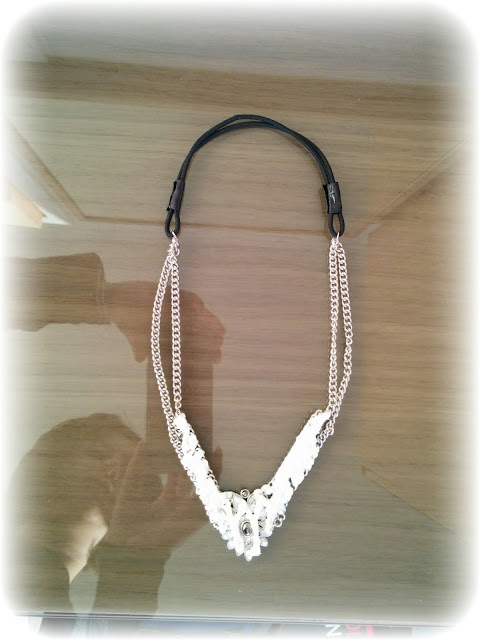
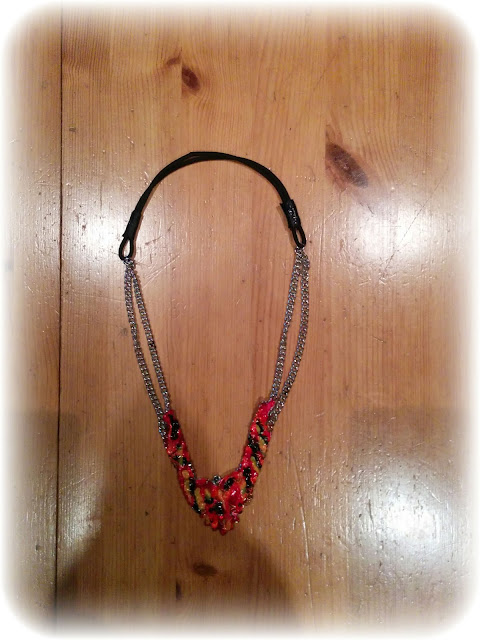
Cool Binns - How to DIY a Tom Binns painted white crystal bib necklace


Image: tombinnsdesign.com

You will need...

Difficulty

Very easy

Can't elaborate on that - think of it in a  no-news-is-good-news sense. It's also pretty quick if you exclude drying time.

Time

20-30 minutes excluding paint and nail polish drying time.

More bargain Binns

Cover most of the centre with your puff paint.

Tip: Speed up the drying process by using a hair dryer or heat gun. Craft professionals may recommend the latter but if it's not available or your idea of cash well-spent, the former works perfectly.


Now for your paint design! I chose black, red, orange and yellow but you can try experimenting with other colour combinations. Dunk your nail polish brush as deep into the bottle as possible, so that it's thick with nail polish, and shake it so that drops fall onto your dry puff paint; alternatively, paint it on thickly. Repeat with the rest of your colours and hold your puff paint vertically so that the nail polish runs in painterly lines.

When your nail polish is dry, you can use clear nail varnish or lacquer as a fixative.


Tuesday 24 December 2013

Binns there done that - how to DIY Tom Binns Au Fait earrings

Tom Binns' Au Fait earrings make a splash in brilliant neons!

Inspiration

Image: Modaoperandi.com

You will need...

Difficulty

Quite easy

Fiddly in places but otherwise a no-sew, no-fuss way to recycle picture hooks and add some painterly pops of colour in the winter gloom!

Time

Hard to tell as I had other distractions but I'd say 30-45 minutes, excluding glue and paint drying times.

Bargain Binns!

Take four of your six picture hooks and separate out the lower sections on them (these bits are for hanging so they should be flat and sort-of oblong when you cut them out); then, cut away the top sections (these are the bits with the holes where you should cut them with your pliers, so they should end up with jagged edges).

With the two remaining hooks, straighten out the lower bends and the curls of the top sections but keep the upper bends intact so they're at a right angle.

Mix your araldite and put the pieces in place like they are on the original - with the longer oblong bits at the top and the jagged-edged bits at the bottom. Mix and use your araldite piece by piece as it hardens extremely quickly (especially the one I used).

Glue your earring studs at the tops of the hooks. I threaded mine through the lower of the two holes and stuck them in place. After the glue has set, curl your top bits over the studs so that those parts of the hooks look like they did before.

When your glue is completely dry (which  may take several hours) paint on your design; after that has dried, coat it with 1-2 layers of clear lacquer or nail polish.


Sunday 15 December 2013

DIY denim jacket

In a quick shout-out to rather awesome DIY fashion blog, DIY Vine I thought I'd try one of the tutorials, namely the revamped denim jacket. I don't want to give the ending away but it involves a pattermed scarf. Here's some quick Instagrammage of mine:


Sunday 8 December 2013

Scrunch Time - How to DIY a scrunchie

Harper's Bazaar may have vilified them, Carrie from Sex and the City, might not have been "caught dead at a hip downtown restaurant wearing (one)" but now that the scrunchie is back - introduced in its resplendence at the London 2012 Olympics and endorsed by Cara Delevingne, Hillary Clinton and Sienna Miller - I thought I'd take the liberty of showing you how to make one.

You will need

Difficulty


Quite easy

Never one to blow my own trumpet, you understand, it was a walk in the park for me but in the interests of covering myself, I'm going to say that it may be slightly more challenging for relatively inexperienced seamstresses.

Time

Under an hour. Sorry to be vague. If I weren't photographing each step of the process it probably would have been minutes, but I'm not entirely sure.

Total cost

£2 because I already had some elastic lying around and because b*tch, please, it's a scrunchie!

In the hair tonight...


Cut as long a rectangle as possible out of your scarf, measuring about 10cm in width (it's relatively easy to eyeball it). Turn it so that it's wrong-side-up (generally the paler, less glossy side), fold the ends back on themselves and iron them down.

Fold the fabric along the length - so that it's long and narrow - with the wrong side still facing outwards. Sew the edges together (not the folded ones).
Cut a length of elastic 15-20cm in length, depending on how wide it is.
Turn your fabric so that it's right-side-out, feed your elastic through it and scrunch it (would you believe!) into the centre. Pin the exposed ends of your elastic together and sew them.
Use your needle and thread to slip-stitch the two ironed-back edges together.

VoilĂ ! It's really that simple and quick. I just hope I haven't created a monster or helped to compound the felony if scrunchies really are back to haunt us from the atelier to the high street, at every conceivable level of taste! Just remember, if It's good enough for Marc Jacobs and Missoni, it's good enough for a crafter with a good eye and a scarf in need of recycling.


Sunday 1 December 2013

Wonder Cover - A quick tutorial for customising a phone cover

A cheeky quick one for those of you who love, cherish and can't do without your smartphone - so much so that you want to protect it any way you can; you want to give it a secure home, that will protect it from all the horrors of the world and at the same time make it look fabulous. Your only problem is that it isn't an iPhone - it's better!

My beloved Google Nexus 5 mightn't be the sort of phone you'd typically associate with an arty type like me but as a camera, gaming platform and organiser it does as good a job if not better than the aforementioned iPhone. Why, then, do none of the high street shops we know and love - never mind the fashion labels - do any covers for them? Why are their covers - surely a basic protective essential - relegated to the remotest corners of eBay? Still, at least my clear one only set me back £3 - and inspired this 10-minute DIY entry!

You will need...

Difficulty

Very easy

I'll say it again, a 10 minute job like this would realistically have to fit comfortably under that category!

Total cost

Mine came to £6 - how many "Me-phone" covers can you buy for that kind of money? (Must. Rein. In. Smug. Attitude).

Just in (one) case...


Apply your glue quickly so that it doesn't start to dry in the process.Once you've completely covered the inside of the back (not the sides, unless you also want them to be covered) with a thin layer of photo glue, place your printed-out design face-down. Coat it with a layer on top for extra protection.
Leave it to dry  - don't try to attach it to your phone until it's completely dry.